Showing posts with label Level: Beginner. Show all posts

Fondue Gala Details

Annually my friend Erin and I host a fondue holiday party for couples only (kiddos have to stay at home). We provide the meat (chicken, steak, sausage, shrimp) and everyone else signs up for different sides. This year we made three different fondues - oil (for the meat), cheese (for the bread and sausage) and chocolate (for the breads, fruits and cookies). Wanted to share a few photos of the festivities....

Prepping for the party:
 We had 24 confirmed guests, so we converted the space with our specified color scheme (red, silver and white). The table cloths are scrap fabric, and the white plate have been collected over the year at garage sales. Each table had 2 oil fondue pots and two cheese fondue pots. (The chocolate pots were in the dessert station in the kitchen). We even covered the already beautiful curtains with red draped fabric.


We wanted everyone to have two similar color forks (to help alleviate confusion of whose meat is whose!)....however some of the forks didn't match, but Erin came up with an AMAZING idea....NAIL POLISH!!!! Not so sure why she had white and emerald green nail polish, but I didn't judge because it solved our problem!


 Along wth the matching white dishes, we wanted white napkins. At last minute I cut the last twelve napkins, but I didn't get a chance to serge the edges, but I came up with a very quick fix......sear the edges with FIRE!!!!! Worked out beautifully and no one new any different!


One cool feature we had was a "photo booth room" for our guests. We provided props, a camera on a tripod and a backdrop. It was a HUGE hit of the party! Below is Erin giving us a quick trial run....


We also like to give our guests a little take-home treat, to which we were inspired by an idea on Pinterest  from "Not So Idle Hands" (who doesn't love Pinterest, right?!).

Here's how we made them.....


Get inspired today, Becky

Update Your Lamps!

So.....I had an okay lamp on our end table in our bedroom, but I'm never okay with "just okay"
So of course I have to update it! I found some buttons, some straws, spray paint, glue gun.....and forget about it!!!!


Extra Storage for your Stroller

Let's just get it out of the way - my photos aren't terrible, but they're not great either! Clearly I had the wrong settings and didn't pay attention enough to notice. UGH! At any rate, this tutorial is too cute and handy not to share, so I'm sucking it up and letting you all in!

This is a winter coat that was supposed to fit my second son for this winter, however, he's bigger than my first was at this time, so it wouldn't work! Yes, I could donate it, but how in the world would I be able to help Liberate Your Creativity if I did that! With this coat I created two separate projects. The first one was with only the hood. The removable hood has two snaps at the base and buttons along the button to secure itself to the coat.

Burlap & Starfish Wreath

I'm excited to feature Roeshel from The DIY Showoff today! Roeshel has offered a great project using burlap! Burlap is always a fun fabric to get creative with - so many uses and it's always wonderful to see what people come up with while using it! Be sure to visit Roeshel's site - she's got a great eye for creativity!
_________________________________________________________________________
Level: Beginner
Topic: For the Home
Time: 1-4 hours
Easy DIY Burlap & Starfish Wreath

Buckle Earrings

Topic: Accessories
Time: Less than an Hour

Why do I have an entire muffin tin full of unpaired earrings? Simply put is because I have an unrealistic idea that somehow I will one day find where my 1 year old "hid" mommy's pretties. The day I find the pairs to some of my fav earrings is the day all of my socks find their pairs, so I might as well do something else with the pieces I do have! Rooting around my drawer of randomness tonight drew up a couple funky silver belt buckles! Here's a little scrappy summary of my creations.....

Pin It

Poppy Summer Garland

Hi I'm, Jen from LipstickandLaundry, trading places with Becky from Liberate Creativity ... Hope you enjoy the Summer California Poppy Garland!

California Poppy Garland...


Chalkboard Wine Glasses

Level: Beginner
Time: Less than an hour
Topic: Painting

Okay, I love wine. I've said it....the secret is out! Since I've shared it with you all, you should know my newest ideas.....let's forget those wine charms and introduce some easy-peasy labels.....no one wants to lose their wine glass at a party for goodness sakes!


Step 1: Gather your wine glasses

Dry Erase Possibilities!

Have you ever tried Dry Erase paint? Okay, seriously, you should. Recently I completed a couple easy-peasy projects using this amazing paint.....

1. Dry Erase "Idea" board for my craft room
2. "Menu" board for my kitchen

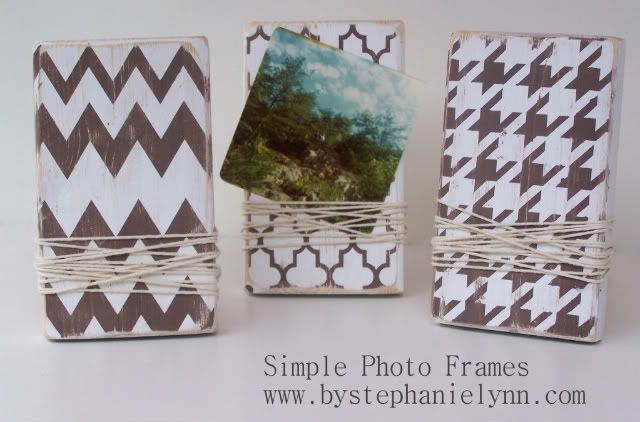
Simple Photo Frames

Hi my name is Stephanie Lynn from Under the Table and Dreaming and I'm delighted to be visiting Becky today!


Level: Beginner
Time: Expect 1-4 years
Topic: Housewares
I have a simple frame to share with you today that can also double as a little note holder too.

Egg-Cellent Strand of Festive Lights

How many extra plastic Easter Eggs do you have lying around???? Geez oh peat, we reuse them year after year; however we seriously need like 20 for next year....not hundreds! I've come up with a couple great projects to reuse these plastic gems! Seriously, you'll want to check this out!
Level: Beginner
Time: 1-4 Hours
Topic: Repurpose


Gift Bag Organizer

Here's a simple and fun organization idea for all those gift bags, tissue and ribbons! If you're anything like me I can rarely find tissue paper amongst the millions of gift bags when I'm rushing out of the house to a party (running late as usual!). This organization has helped keep it all more straight and easy to access. (It's also a great thing to do for baby showers, bridal showers, birthdays, etc. - how excited would that person be to have everything all sorted and organized for them directly following their party?!)


Level: Beginner
Time: Less than an hour
Topic: Organization


Supplies Needed:
XL Gift Bag
Clothespins


Happy Friday!

Bathroom Door Revamp

Bathroom Door Revamp!

Level: Beginner
Time: Expect 1-4 Hours
Topic: Housewares

This is our Bathroom door. This Bathroom is attached to our Kitchen. It's not very sound-proof....like, at all!  
So I thought I could maybe "sound-proof" it a bit, plus make it cuter...

Chalkboard Train Track Table

Level: Beginner
Time: 1-4 Hours
Topic: Paint, Repurpose

On Charley's 2nd birthday I was insistent that we get him a train table! For goodness sakes, he adored the one at our pediatrician's office, so of course he would love one at home, right?! WRONG! Charley has spent zero to little time with this train table - mainly because we bought a double-story track that had to be glued and screwed to the table to be able to stick together....that made him mad! He wanted to be able to change things around. So I had hope that Wilson would use it.....not yet, but he's only 1, so I continue to hold up hope! Instead of freecycling the whole thing, I came up with a great idea - MOMMY-ReDO!!!!!

Fabric Coffee Cozy

How to make a fabric coffee cozy...
Instructions by: Rachael Lindsay
Level: Beginner
Time: Less than an hour
Topic: Sewing

These coffee cozies are so fun and unique. These are an absolute favorite in my Etsy store. There are so many types of fabric to use, and they can fit any personality....

Cake Pops and Baby Shower

This past weekend I was thrilled to travel to Annapolis to see my bestie Sage. Sage is expecting her first baby in June and we don't get to see one another as much as we'd both like. I had to bring a much larger suitcase than anyone staying a weekend would need, but of course I had to make her baby a cazillion presents! (More posts and photos later of the projects). At any rate, we threw her a baby shower on Sunday and made some fab cake pops! Cake pops are the big rage right now, due to Bakerella's incredible talent - if you haven't checked her out, you need to. Seriously
....GO NOW!

Wanted to share just a couple of photos. Bakerella has a wonderful site and discloses the recipes, tricks of the trade and all.


Zen Garden

Create your own Zen Garden with House of Hepworths.
Level: Beginner
Time:  Less than an hour, easy!
Topic: Housewares

Materials Needed:Shallow glass dish or bowl
bag of polished stones filler
three 5" white or cream candles
twine


This is such an easy display to put together, but it has such a huge impact! I found my glass dish from goodwill, but I've seen them at Michaels and Hobby Lobby.
DSCN9015 copy

Repurposed Frames

Frames have been quite our theme lately, right?! Well, I adore frames and the various projects we can create! Shannon from Bless Our Nest has been gracious to visit us again....just can't get enough Shannon, right?! Seriously, check out this post and then head over to Bless Our Nest...super great content!


I also have been thinking we need another giveaway soon....right????!!! Please include in your comments what kind of giveaway you'd like to see (Dream big, but don't get your hopes up too much!).......AND HERE'S SHANNON....

Re-purposing Old Frames

Level: Beginner
Time: Expect 1 hour or less
Topic: Houseware


How do you like these beautiful pictures from the 1970's that my Grandmother gave me? I'm sure you are very jealous!

I knew I could do something with them, I just didn't know what. I thought about it for a couple of weeks and decided I needed something beside our bed. I had thought about printing out something that said "His" and "Hers" and then hanging them on each side of the bed but that just wasn't working.

Chalkboard Coat Rack

I'm Becky from Liberate Creativity. I'm honored to be visiting you all today! Two things you should know about me before I continue....
1. I'm constantly looking for updates and creative ways to spice up the norm
2. I'm addicted to chapstick


Wanna meet me?????

Okay, okay, this isn't a photo of me, but it just so happens to be a photo of my fav person in the entire world - my Gramama! Isn't she BEAUTIFUL???????
She's the woman who gifted me with my creativity and personality so wouldn't you prefer to see a photo of her way more than me????? Of course!!!!! Okay.....let's get on with this tutorial....

Distressed Wood Frame

Hello!  My name is Abby, and I have a little blog called “Artist for Hire”.  I really enjoy all things arts and crafts, and I also have a huge love of photography.  You will often find me chasing my two children around with my camera!  Today I want share a tutorial on how to create a distressed finish on a wooden frame.  A perfect place for all those photos!

Level:  Beginner
Time to Complete:  2 hours (including drying time)
Topics:  Painting techniques

Picture Frame Chalkboard

We're thrilled to have Laura & David from We Design Studios here today to let us embrace in some creativity! Let the fun begin!!!!!


Okay, maybe a better idea of what David & Laura look like!
 Picture Frame Chalkboard

Level: Beginner
Time: About one hour (plus 24-hours for drying)
Topic: Home Accessories

Hello! I’m Laura from WE Design Studios, a design and art education company dedicated to bringing out the creative genius in everyone! While recently re-designing my studio work space I repurposed an old mirror into a chalkboard so I could jot down notes and to-do lists. It was super easy to make. Today I will show you how you can make one using old picture frames.

Here’s what you need to get started:


1. A picture frame or mirror with a nice decorative frame (I got this one for $10 at an antique shop!)
2. Painter’s tape
3. Chalk
4. Newspaper
5. Glass cleaner
6. Chalkboard spray paint  (Note: You can also use the kind that comes in a can and is applied by brushing. I find the spray version coats more evenly. Both can be found at a hardware store.)

Step 1: Using glass cleaner and a rag or paper towel, wipe down your picture frame glass or mirror. Make sure the surface is clean and clear of any debris. The surface should be as smo <!--[if !vml]--><!--[endif]-->oth as possible when you apply the chalkboard paint.

Step 2: Apply painter’s tape to the inside edge of the frame. Be sure to cover the entire frame but keep the glass exposed.


Step 3: Find a well-ventilated area to apply the chalkboard paint. Lay down newspaper to protect your frame from scratches and the ground below from the chalkboard paint. Outside is an ideal option.


Step 4: Place your frame or mirror on the newspaper and begin to apply the chalkboard paint. Be sure to read and follow the directions on the paint can. You usually need to shake the can vigorously for two minutes before spraying. Test out the paint by spraying on the newspaper before applying it to the glass.
Step 5: After 15 minutes apply a second coat of chalkboard paint.


Note: It is normal for the chalkboard paint to initially be reflective and glossy. Once it dries it will have the opaque, flat quality of a chalkboard. Just be patient!


Step 6: Allow the chalkboard paint to dry for 24 hours before using. Your particular paint may call for more or less time. Follow the paint label instructions.

Step 7: Once the chalkboard is completely dry prime the surface by rubbing the entire writing area with the broad side of a piece of chalk. Then erase the surface. Doing this will prevent permanent chalk marks from forming on the chalkboard.


Step 8: You now have your very own picture frame/mirror chalkboard. If you have left over chalkboard paint you can get creative and see what else you can make into a chalk board. Enjoy!


Thanks to We Design Studios for visiting....please be sure to check them out often and share with your friends!